Step by step instructions for Parsing of Person’s Name
Parsing of Person’s Name Showcase
This document has been written for developers who want to implement Kleber Parsing of Person’s Name Showcase on their websites. To make the showcase easier to test and implement, this document provides code samples with each step of implementation that can be copied and paste into websites.
If you want to test the person’s name parse showcase in real time you can use JS Fiddle. JS Fiddle is a helpful tool for developers to manage codes easily when testing codes. JS fiddle layouts web development programming language such as HTML, CSS and JavaScript in a three separate panels, making it simple for developers to work on all codes at once. In JS Fiddle, developers can collaborate and share codes.
Click the JS fiddle button to start testing Parsing of Name showcase 
Below is a sample of person’s name form that we will use for this step-by-step.
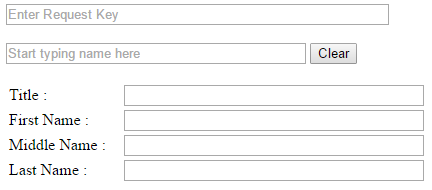
Fig-1: Person’s Name Parse form template
Before testing the showcase, a HTML form is necessary in testing to capture the person’s name to be parsed. The code below is an example of a basic HTML form that would help you start.
Create a new PersonsNameForm.html file and insert the code below.
<html>
<head></head>
<body>
<input name="RequestKey" id="rkey" value="" type="text" size="50" placeholder="Enter Request Key" />

<br><br>

<input id="parserline" name="ParserLine" type="text" style="width:300px;" placeholder="Start typing name here"/> <button type="button" id="clear">Clear</button>

<br><br>

<form>

<table id="allfields">
	<tr>
		<td>Title :</td>
		<td style="width: 10px"></td>
		<td><input id="Title" name="Title"  size="50" type="text" class="textbox" style="width:300px;" /></td>
	</tr>
	<tr>
		<td>First Name :</td>
		<td style="width: 10px"></td>
		<td><input id="FirstName" name="FirstName" size="50" type="text" class="textbox" style="width:300px;" /></td>
	</tr>
	<tr>
		<td>Middle Name :</td>
		<td style="width: 10px"></td>
		<td><input id="MiddleName" name="MiddleName" size="50" type="text" class="textbox" style="width:300px;" /></td>
	</tr>

		<tr>
		<td>Last Name :</td>
		<td style="width: 10px"></td>
		<td><input id="LastName" name="LastName" size="50" type="text" class="textbox" style="width:300px;" /></td>
	</tr>

</table>
</form>
</body>
</html>
Note
- If you are testing the Parsing of Person’s Name Showcase using JS Fiddle tool, you do not have to copy and paste the code of HTML form. The codes are already pasted on panels by default.
- If you want to use your own HTML form, please keep in mind that the ‘ID’ value will be different.
Step-by-step how to code JQuery with Kleber
Step 1
You should have a form ready for testing. It is either the form we provided or your own person’s name form.
Please paste the following code into your application. The code below adds the required JQuery libraries for the autocomplete Ajax call. The CSS section adds a ‘processing’ gif so that there is a visual indication that the code is waiting for a reply from the server. Paste the following code into the <head> section of your page.
<link href="http://kleber.datatoolscloud.net.au/jquery19/themes/base/jquery.ui.all.css" rel="stylesheet">
			<script src="http://kleber.datatoolscloud.net.au/jquery19/jquery-1.9.1.js" ></script>
			<script src="http://kleber.datatoolscloud.net.au/jquery19/ui/jquery.ui.core.js" ></script>
			<script src="http://kleber.datatoolscloud.net.au/jquery19/ui/jquery.ui.widget.js" ></script>
			<script src="http://kleber.datatoolscloud.net.au/jquery19/ui/jquery.ui.position.js" ></script>
			<script src="http://kleber.datatoolscloud.net.au/jquery19/ui/jquery.ui.autocomplete.js" ></script>
			<Script src="http://kleber.datatoolscloud.net.au/jquery19/ui/jquery.ui.menu.js" ></script>
			<style type="text/css">

		.ui-autocomplete-loading {
					background: white url('http://kleber.datatoolscloud.net.au/dt_processing_images/dt20x20.gif') right center no-repeat;
				}
			</style>
Step 2
Below is the first section of the JQuery $(function). Paste the following code after the </style> tag from Step 1.
		$(function (){


				$('#clear').click(function(){
					$("#parserline").val("");
					$("#Title").val("");
					$("#FirstName").val("");
					$("#MiddleName").val("");
					$("#LastName").val("");


				});

				$('#parserline').keyup(function(){
				var parseline = $("#parserline").val();
				var rkey = $('#rkey').val();
There are a number of settings that can be set for the Ajax call however we have found the below settings work best.
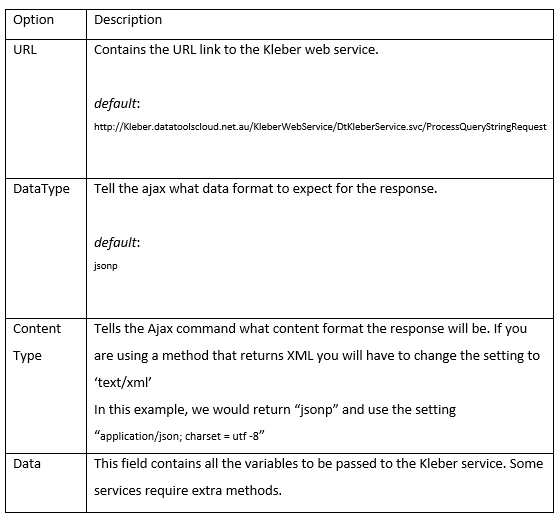
The URL parameter holds the web URL for the KLEBER web service. If it does not contain the correct URL, the Ajax call will not receive the required response.
Step 3
Below is where the Ajax call is performed to parse the name input by user.
Please see code below for an example. Copy and paste this code to your application after the sample from Step 2.
$.ajax(
{
url: "http://Kleber.datatoolscloud.net.au/KleberWebService/DtKleberService.svc/ProcessQueryStringRequest",
dataType: "jsonp",
crossDomain: true,
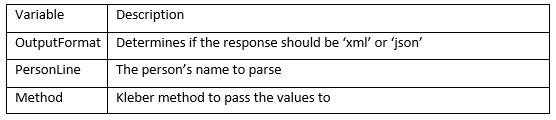
data:
{
OutputFormat:"json",
PersonLine1:parseline,
PersonLine2:"",
PersonLine3:"",
PersonLine4:"",
PersonLine5:"",
PersonLine6:"",
Method:"DataTools.Parse.PersonName.Parse",
RequestKey:rkey
},
success: function (data)
{
$.map(data.DtResponse.Result, function (item)
{
$("#Title").val(item.Person1Title);
$("#FirstName").val(item.Person1FirstName);
$("#MiddleName").val(item.Person1MiddleNames);
$("#LastName").val(item.Person1LastName);
});
}
});
});
});
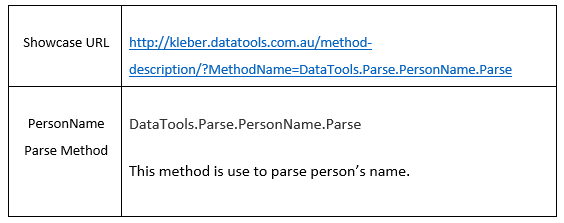
The example above uses the Kleber method DataTools.Parse.PersonName.Parse to parse a person’s name typed in by user.
For more information of this method see http://kleber.datatools.com.au/method-description/?MethodName=DataTools.Parse.PersonName.Parse
A Request Key (RK) is assigned and provided after you successfully register your Kleber account. Every client has a unique Request Key and it should be protected when making a call to Kleber server. In order to protect your RK, you can generate a Temporary Request Key that can be used to test all Kleber methods.
The DataTools.Security.GenerateTemporaryRequestKey method will create an encrypted key that can last anywhere from 3 seconds up to 5 minutes based on your application needs. It helps prevent anyone from using your Kleber credit as it becomes unusable once it expires.
For more information about generate temporary keys, please click on this link: http://kleberwebsite.datatoolscloud.net.au/kleberbrowser/KleberMethodDescription.aspx?Method=DataTools.Security.GenerateTemporaryRequestKey
Note: Please keep in mind that it is important to protect your Request Key to prevent your account credentials being used without your permission.